
Exhaust fan systems are like the unsung heroes of ventilation, quietly whisking away moisture, odours, and stuffiness from your home. The installation of one such system might seem like a daunting task at first, but worries!
We will walk you through the process of exhaust fan installation and fan fitting, from start to finish in simple, easy-to-follow steps. So, let’s dive in!
Exhaust fans are essential for indoor spaces. They ensure proper ventilation and air quality by expelling stale air and moisture. There are various types of exhaust fans, each designed to suit specific needs and installations.
Ideal for bathrooms and kitchens, these fans are mounted on the ceiling to remove moisture, odours, and pollutants efficiently.
Perfect for spaces where ceiling installation isn’t feasible, these fans are mounted on walls to provide adequate ventilation, especially in smaller rooms.
These fans are installed within the ductwork, offering powerful ventilation solutions for larger areas or where ducted ventilation is preferred.
When selecting the appropriate exhaust fan size for your space, it’s important to assess both the dimensions of the room and its intended usage patterns. For instance, a compact bathroom might suffice with a modestly sized fan, while a bustling kitchen or workshop may necessitate a more robust unit to effectively handle increased moisture and airborne particulates. Thus, considering these factors will help you with your bathroom exhaust installation process.
Before understanding the exhaust fan installation or replacement process, proper pre-installation preparation is essential.
1. Start by gathering all the necessary tools and materials, including screwdrivers, wire cutters, electrical tape, and of course, the chosen exhaust fan unit.
2. Next, assess the installation location carefully, considering factors such as proximity to electrical wiring and optimal placement for maximum ventilation efficiency.
3. Take precise measurements and mark the mounting area accordingly, ensuring it aligns with the manufacturer’s recommendations and local building codes.
Whether it’s a new exhaust fan installation or replacement for an existing unit, this meticulous pre-installation groundwork sets the stage for a hassle-free bathroom exhaust installation or any other exhaust fan fitting endeavour.
Follow these step-by-step instructions to ensure a successful installation process.
To kick off the installation process smoothly, start by clearing the work area of any clutter or obstacles. Next, carefully mark and cut a hole in the ceiling or wall where the exhaust fan will be installed. Ensure you take precise measurements for a proper fit. Additionally, verify that there is sufficient access to ventilation ducts nearby to facilitate seamless connection later on.
Before starting any electrical work, be sure to turn off the power supply to the designated circuit at the breaker box. This precautionary step prevents accidental shocks or mishaps during the installation process. Next, mount the electrical box securely in the designated location, ensuring it is compatible with the exhaust fan unit.
Follow the manufacturer’s instructions carefully to connect the wiring from the electrical box to the corresponding terminals on the exhaust fan unit. Double-check all connections to ensure they are snug and properly insulated to prevent any electrical issues down the line.
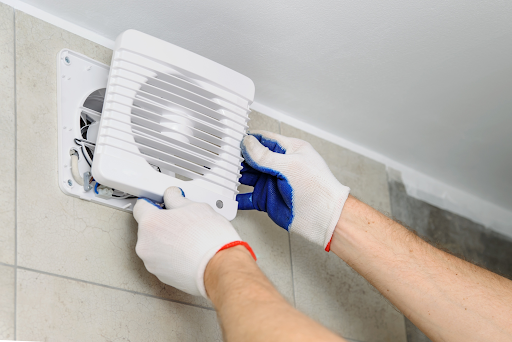
Now that you are done with the electrical work, it is time to mount the exhaust fan. Begin by attaching the fan housing to the pre-cut hole in the ceiling or walls using screws or brackets provided with the fan. Make sure the unit fits snugly and securely in place to prevent any wobbling or instability. Take a moment to check for proper alignment and levelness to ensure optimal performance and aesthetics once the installation is complete.
Next up: ductwork. Connect it securely to the fan housing, ensuring no leaks with clamps or tape. Extend the ducts outside, away from openings, for efficient airflow and prevent recirculation.
Time for the real test. Reconnect the power, switch on the fan, and check for proper operation. Listen for odd sounds and adjust speed or direction as needed. Once it’s all set, take a moment to appreciate your work and enjoy the fresh air in your space.
For an effective and safe installation or replacement, it is highly recommended to opt for a professional.
Encountering noise or vibration? Check for loose components and tighten them up. If airflow seems blocked, inspect the duct for any obstructions and clear them out. To resolve electrical problems, make sure all connections are firmly secured and undamaged. Tackling these typical exhaust fan repair issues promptly guarantees that your exhaust fan functions efficiently and effectively.
Correct exhaust fan installation ensures improved air quality and comfort within your home. Whether it is a simple exhaust fan replacement or a fresh installation, understanding the process of exhaust fan fitting is essential. With the right knowledge and tools, tackling bathroom exhaust installation or any other exhaust fan installation becomes a manageable task.
Choose Wired Air to install your exhaust fan system and ensure optimal performance and longevity. Call 0429 612 624 to schedule a professional installation.

This article explains how a smoke extractor fan works, why it is essen

A kitchen ventilation fan is often overlooked in many homes and commer
 Optimized by Seraphinite Accelerator
